How to use EPFO E-Sewa portal?
The EPFO E-Sewa portal is an easy-to-use online facility, for accessing the Employees Provident Fund requests. Here, the employer can register in a hassle-free manner, without having to physically visit the EPFO office. It offers a paperless facility, to submit the information related to KYC. The employer can update the organization’s & the employee’s information so as to make a payment towards their EPF contribution. Further, he can select to pay via the internet banking facility or to take a print-out of the Challan generated and pay at any of the listed branch banks. The employers must first get their organizations registered on the portal. It can be registered by setting up a unique user ID and password on the portal. As the registration is completed, the employees are able to upload the Electronic Return. The uploaded return information is shown on the digitally signed copy. It can be saved in the PDF format online and printed for record purposes. When the employer has approved it, online, a Challan would pop up on the screen that is based on the uploaded return. The employer can and should retain soft, as well as, hard copy for reference and documentation.Who has to be registered at the EPFO E-Sewa?
According to the EPF & MP Act, 1952, the employers must Register for Employee Provident Fund on this portal:- If their establishment employs 20 or more employees. This doesn't include apprentice and casual labourers.
- Afterwards, if at some point in time, the number of persons employed, falls below 20, the establishment shall continue to be governed by the Act.
Advantages of E-Sewa to the Employers
By registering on the EPFO E-Sewa portal, you are able to make use of a range of benefits. For example, deduction summary, total payments made etc. Together with, keeping a check on the various payments being made from the employee’s salary. Employees won't bother you for constantly checking on whether the deductions made from their salary are being deposited or not. Your employees can keep a check on their savings too.- You have the option of working on preparing & submitting EPF without huge paperwork.
- Physical submission of form is not a requirement.
- Instant notification by SMS on the completion of online payment.
- No need of submitting other returns viz Form 5/10/12A,3A, and 6A.
- Employee's accounts will be credited with the contribution month-wise
- Annual accounts data is available online. And can be saved off-line too.
- Prior data from 2011-2012 onwards are available online.
- For financial years before 2011-2012, the annual slips can be requested through this portal.
6 simple steps to get registered at the E-Sewa Facility
Get your organization registered by following the below easy steps:- Click here to log-in at the portal
- Enter the name of the organization, mobile number, and e-mail ID. Verify the capcha and submit.
- A temporary link will be sent to the email-id provided for verification.
- Click on the link and get your business registered. You'll need to enter the required fields and attach the documents related to the organization’s identity, proof of address along with employee details.
- Create a permanent User Id and a new password to log-in in the future.
- Subsequent to submission of the application, it will be processed and verified by the department.
How to Download the E-Return Tool
After your application has been verified and the registration process is completed. You need to download the Software to use the facilities provided on this portal.- Download E-Return Tool. It is highly recommended to go through the User Manual, Instructions for Installation, etc, in the “Help Files and Instructions”.
- Download the necessary components to install, available on the same page,
- You can find the download links for 2 different versions. The available versions are e-Return Tool Version 6.1 and e-Return Tool Version 5.0 (as on the date of writing this process).
- Install the software.
- Start with entering the employee details such as Employees Provident Fund wages and contribution.
- Now you are ready to file Returns. For text file generation, use the module "Generate Returns for submission to EPFO" and "Electronic Challan Cum Return form (ECR)".
Electronic Challan cum Return (ECR) & its Filing
ECR was introduced by the department of EPFO, in April 2012. It was aimed to reduce the paper-work and time while applying for a claim or addition of an employee. In order to be able to use the advantages offered, you must have gone through the above steps and prepared the text file. It is an online electronic monthly return to be uploaded by employers. it is in plain text format involving lines to mention the details. The memberwise details to be filled are related to wages and contributions including basic information for the new and existing members. The uploaded return data would be presented as a digitally signed copy in a PDF format. The uploaded ECR will generate a Challan. Now you have to pay the dues through online payment. In other words, each ECR is linked with a remitted Challan. Those ECRs uploaded but not paid with, will lapse after 12 days of the ECR generation. Now you don't need to file any paper return or the monthly and annual returns, as relevant.The process of Filing ECR is as follows:
Step 1
Log into EPFO E-Sewa portal, using your user-id & password [caption id="attachment_18782" align="aligncenter" width="869"]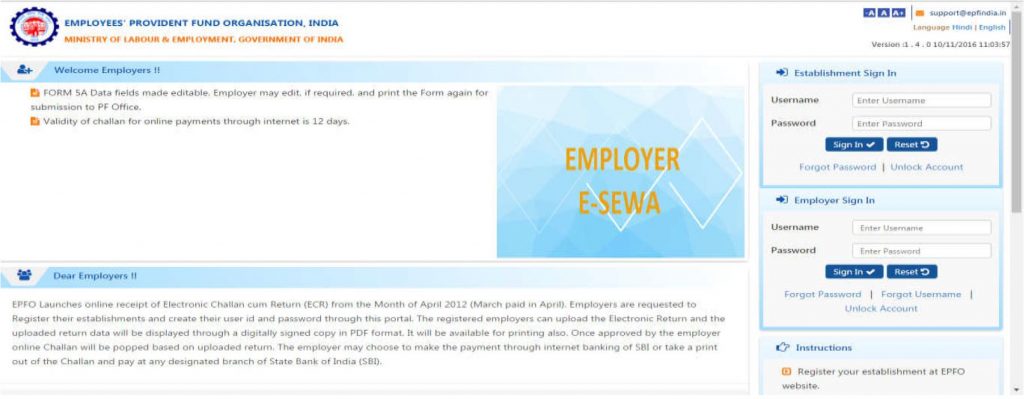 EPFO E-Sewa: ECR step-1: Legal Raasta[/caption]
Step 2
Check your credentials, such as PF code, Name, Address, etc is correctly shown. [caption id="attachment_18783" align="aligncenter" width="874"]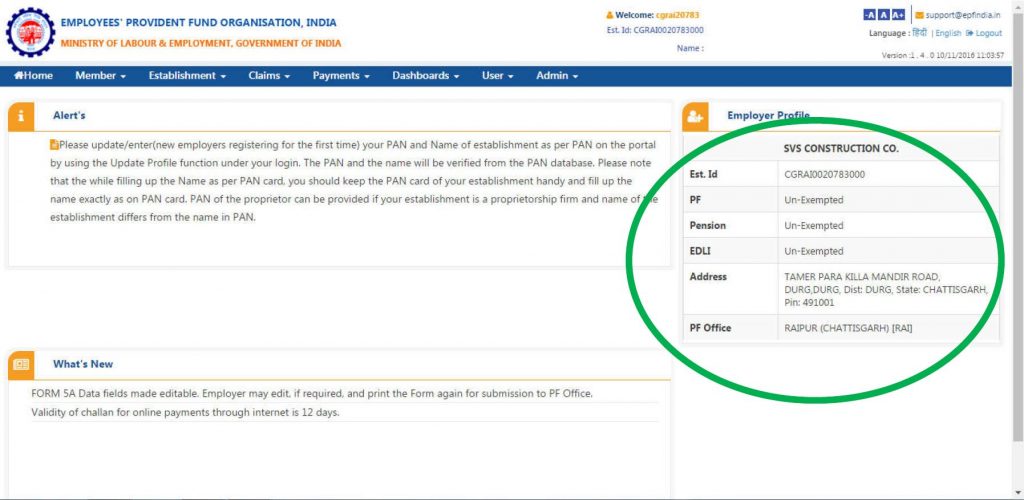 EPFO E-Sewa: ECR step-2, check details: Legal Raasta[/caption]
Step-3
Under the "ECR" module, select the item "ECR Upload". [caption id="attachment_18785" align="aligncenter" width="882"]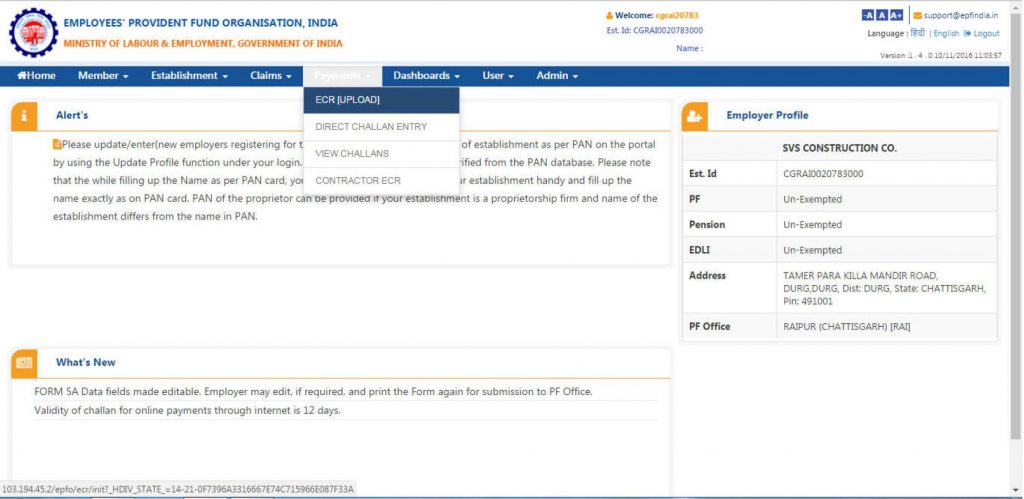 EPFO E-Sewa: Step-3, ECR Upload: Legal Raasta[/caption]
Step 4
A summary sheet where you have to enter details such as EDLI (Employee Deposit Linked Scheme). Salary Disbursal Date, Wage Month etc. As well as, Thereby, check the "Contribution Rate", as applicable to your organization. By default, it is 12%, otherwise. [caption id="attachment_18786" align="aligncenter" width="885"]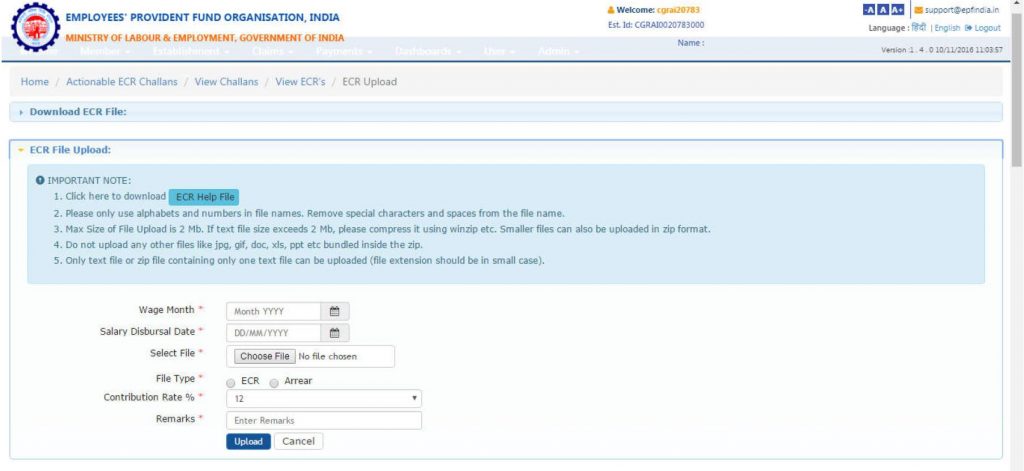 EPFO E-Sewa: Step-4, Summary Sheet: Legal Raasta[/caption]
Step 5
You can check your ECR file with help of “ECR Help File” button. [caption id="attachment_18787" align="aligncenter" width="889"]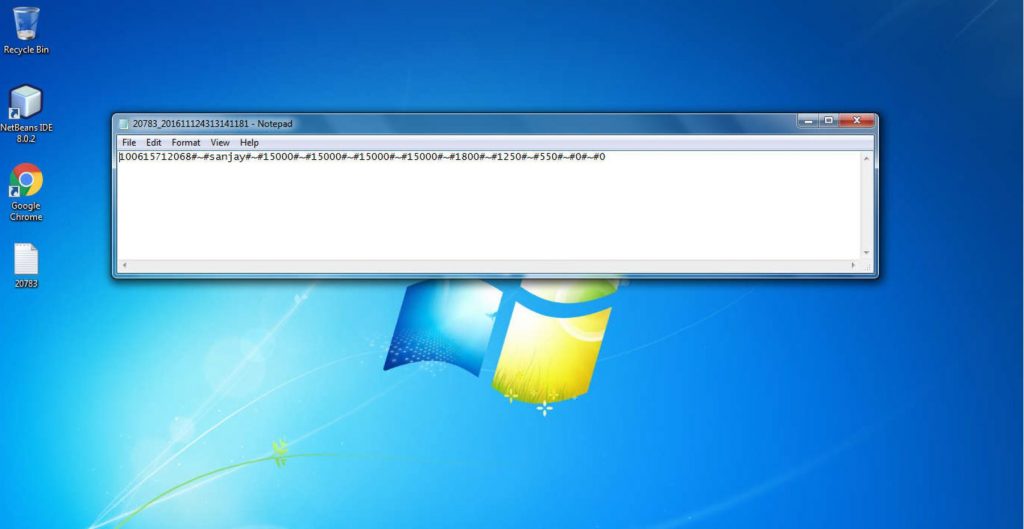 EPFO E-Sewa: Step-5, check ECR File: Legal Raasta[/caption]
Step 6
Your ECR text file will look like the one in the below image. It is digitally signed. If the number of employees in the file is more than 200, you would get an SMS alert to view or download this file. [caption id="attachment_18788" align="aligncenter" width="889"]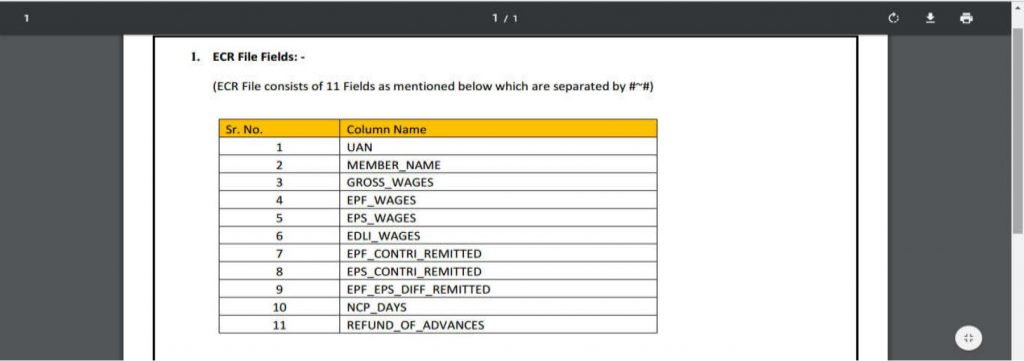 EPFO E-Sewa: Step-6, ECR Text file: Legal Raasta[/caption]
Step 7
Check thoroughly by matching the information on this PDF file and the ECR text file. You are to approve the PDF file by clicking on the "Approve" button. Now choose the file to upload back. [caption id="attachment_18789" align="aligncenter" width="884"]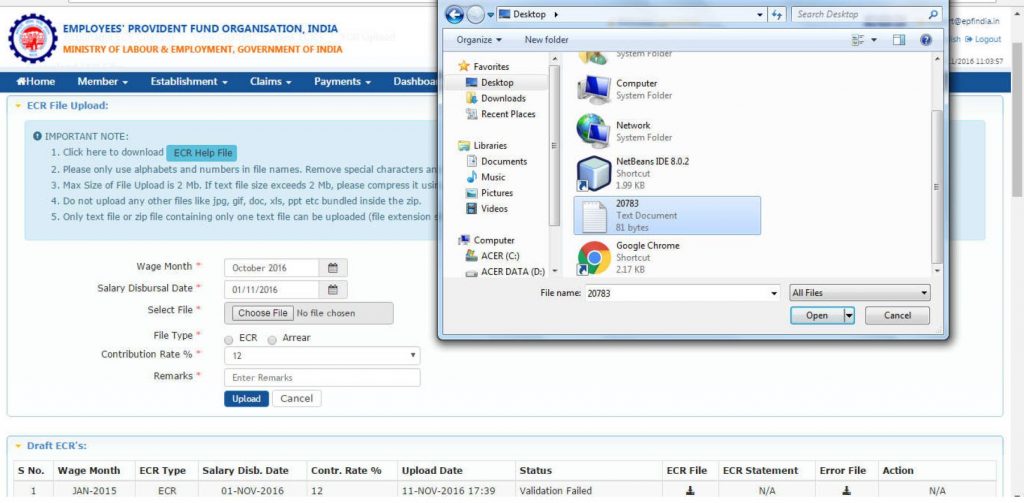 EPFO E-Sewa: Step-7, Choose the file: Legal Raasta[/caption]
Step-8
Submit the ECR, by Selecting "ECR upload". You must confirm that the ECR is being uploaded for the correct month and year. [caption id="attachment_18790" align="aligncenter" width="886"]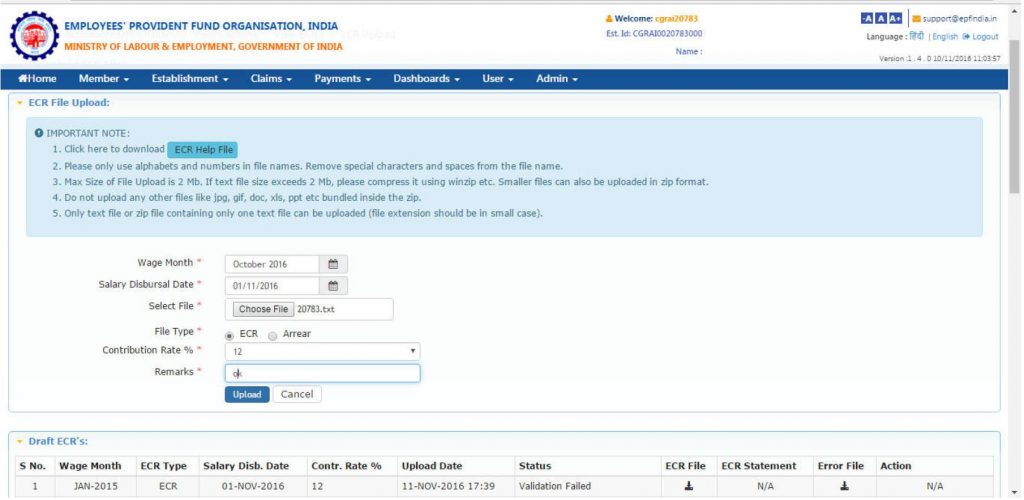 EPFO E-Sewa: Step-8, ECR upload: Legal Raasta[/caption]
Step-9
The uploaded ECR file will be validated. If successful, the following, pop up will appear with a message “File Validation Successful”. Otherwise, an Error will come. [caption id="attachment_18793" align="aligncenter" width="879"]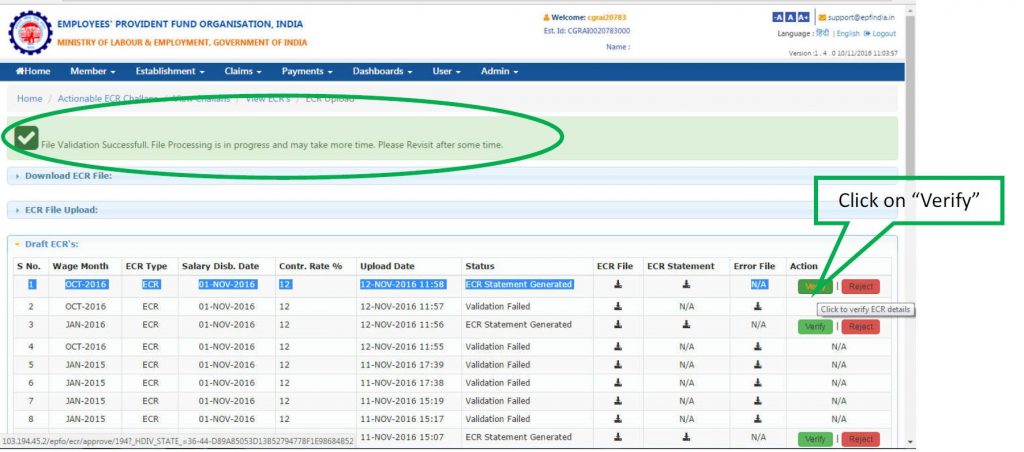 EPFO E-Sewa: Step-9, ECR Validation: Legal Raasta[/caption]
Step 10
Next display is of the Challan Receipt File and Acknowledgment Slip, associated with this ECR as uploaded. A Temporary Return Reference Number (TRRN) will be generated for this uploaded file. [caption id="attachment_18794" align="aligncenter" width="870"]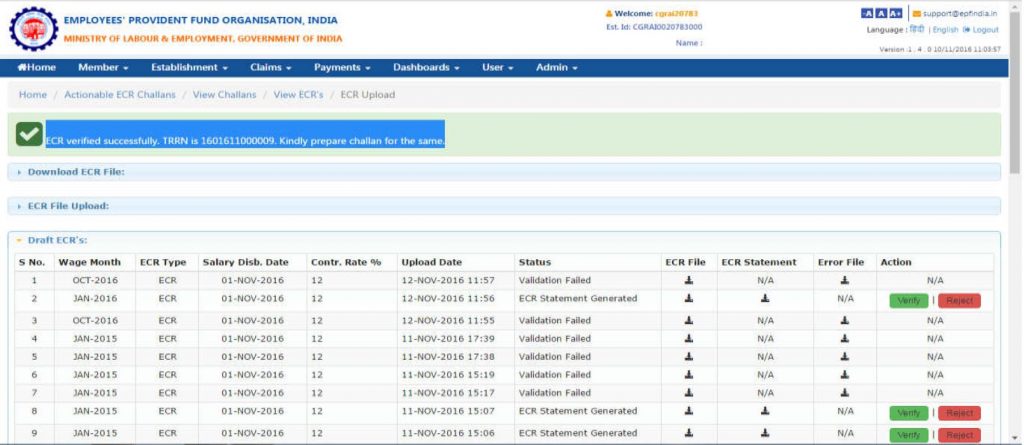 EPFO E-Sewa: Step-10, TRRN: Legal Raasta[/caption]
Step 11
Select the TRRN and click on the “Prepare Challan” button. [caption id="attachment_18795" align="aligncenter" width="871"]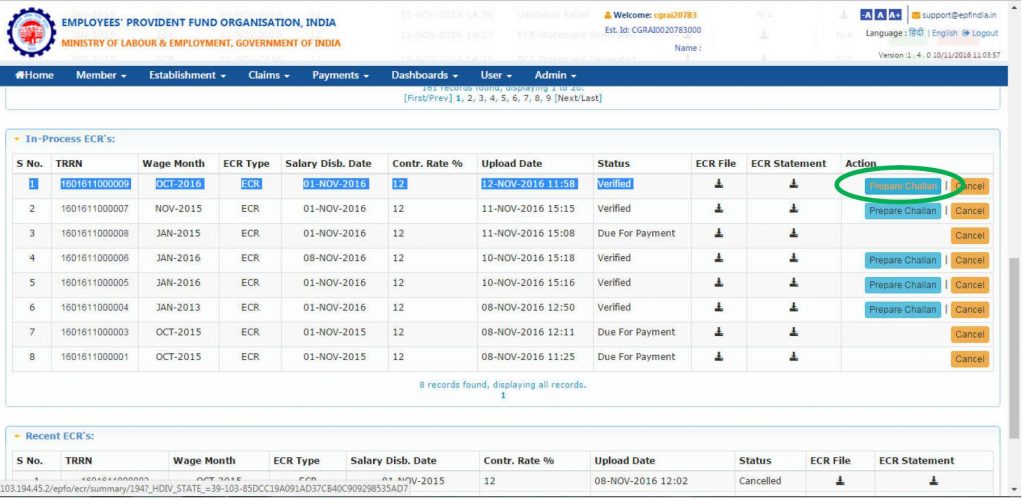 EPFO E-Sewa: Step-11, Prepare Challan: Legal Raasta[/caption]
Step 12
Here, you can enter "Administration"/"Inspection" Charges for A/c No.2 (i.e. Total EPF Charges) & A/c No. 22 (i.e. Total EDLI Charges). Or you can edit EDLI Contribution under A/c No.21. Then, click on “Generate Challan” Button. [caption id="attachment_18798" align="aligncenter" width="871"]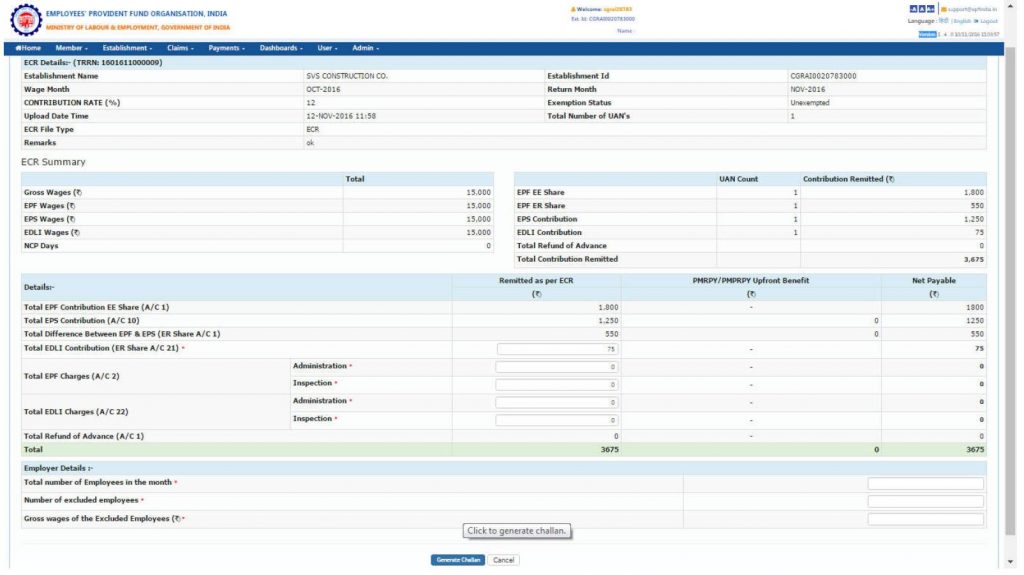 EPFO E-Sewa: Step-12, Generate Challan: Legal Raasta[/caption]
Step-13
The Following screen will appear. You can, still, edit the challan, if required. After you have verified the details, click on the “Finalize” button. Afterwards, download "Ack file" or "Receipt file" from the “In-Process Challan List”. [caption id="attachment_18800" align="aligncenter" width="871"]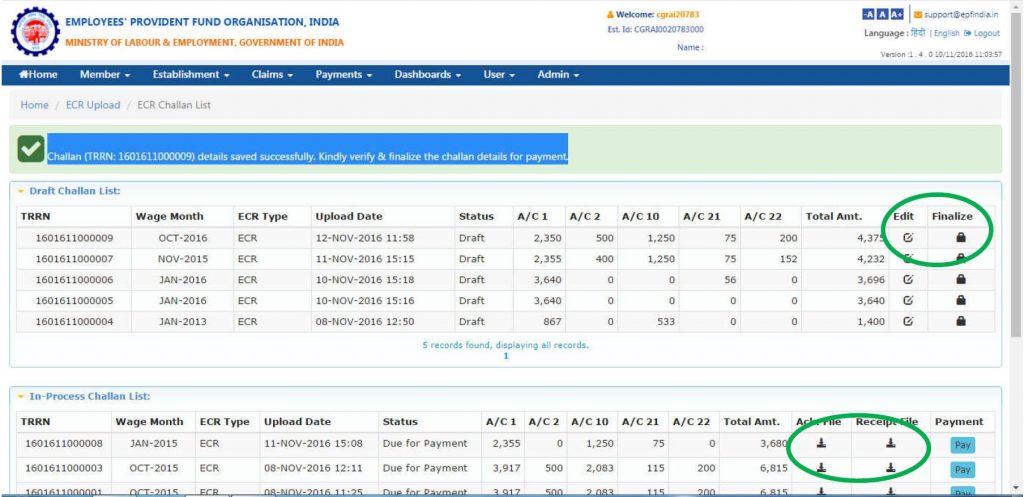 EPFO E-Sewa: Step-13, Finalize ECR: Legal Raasta[/caption]
Step 14
Your finalized ECR Statement and Challan will appear similar to this: [caption id="attachment_18801" align="aligncenter" width="879"]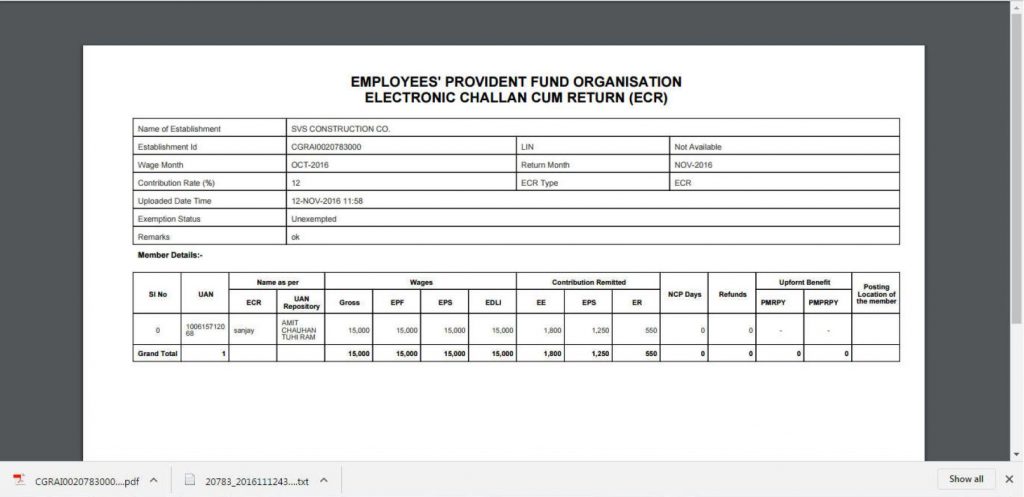 EPFO E-Sewa: Step-14 ECR Statement & Challan: Legal Raasta[/caption]
Step-15
Clicking on the “Pay” button. When you select “Online”, you'll be asked to choose your bank from the drop-down list. By clicking on “Continue”, you will get directed to Payment Gateway. [caption id="attachment_18803" align="alignnone" width="886"]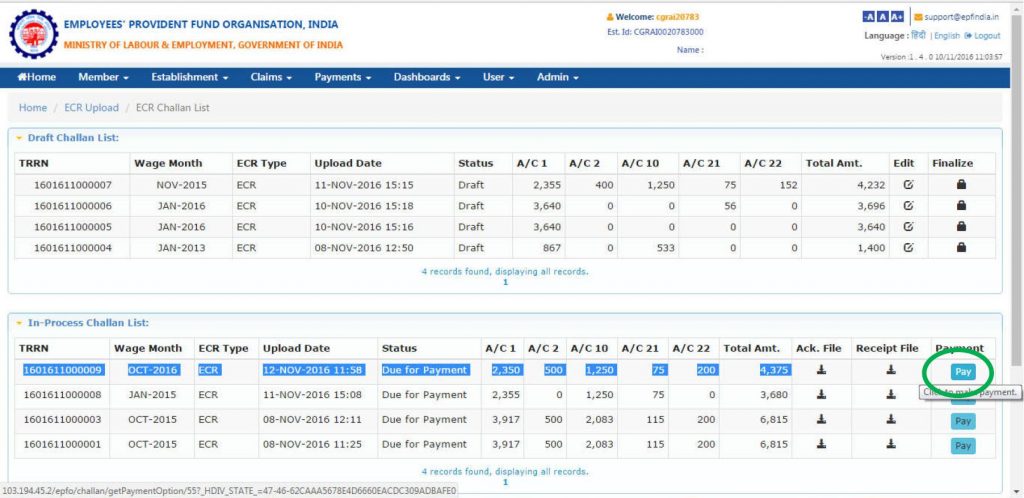 EPFO E-Sewa: Step-15, Pay for ECR: Legal Raasta[/caption]
Step-16
For payment at a designated bank branch, take print of challan with the TRRN number and pay with cheque/demand draft.Step-17
After payment, you'll get an SMS alert to confirm. This completes the ECR filing process for the month.Android App for E-Sewa - UAN Member
[caption id="attachment_18814" align="aligncenter" width="621"]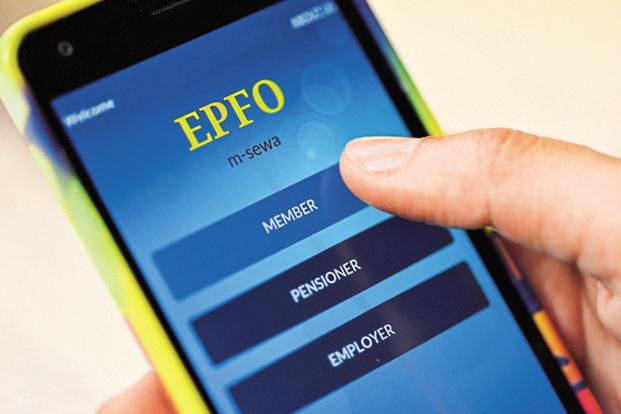 EPFO E-Sewa: UAN App for Android: Legal Raasta[/caption]
The EPFO has launched a mobile application for UAN Members, "EPF UAN Member E-Sewa Helpdesk". This UMANG App is available for download on Androids with version 2.3 and above. This App has solved many problems associated with the Universal Account Number (UAN).
The key characteristics of this app are enlisted below:
- This application enables you to get a Universal Account Number (UAN) online instantly.
- You can also activate your EPF UAN.
- The status of the tasks request to the department can be checked online as well, on the move.
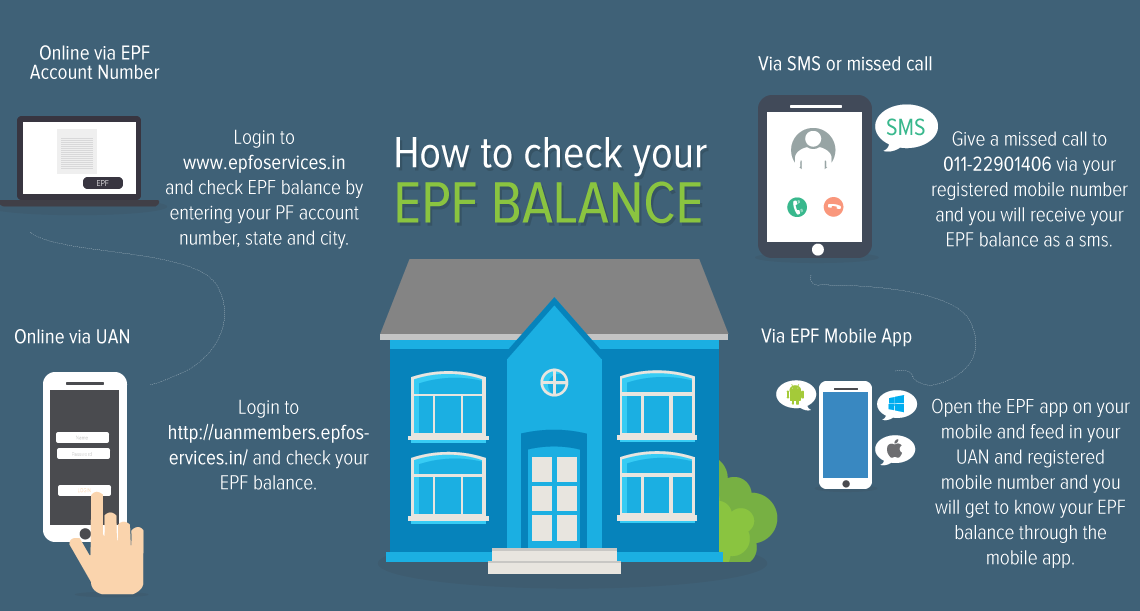
- The balance in your PF account can be checked easily.
- You can download the EPF e-Passbook.
- There's KYC authentication, by email address, and mobile number, facility on the App too.
- You can link all your provident fund accounts through this App.
- Last, but not the least, it gives you the facility to access an Online Claim Transfer Portal (OCTP).
- You can connect all the provident fund accounts of employees via this android application.
Also read:UAN Activation Online | UAN Registration & Procedure

